6 Stunning Patio Design Ideas | Inspiration for Your Project

The perfect patio design blends comfort, style, and functionality. Whether you want a cosy retreat for relaxation or an entertainer’s paradise, the right design can transform your outdoor space into a stunning home extension. From lush greenery to elegant furnishings, the proper elements will enhance aesthetics and practicality. Get ready to explore six breathtaking patio ideas that will inspire your next outdoor project.

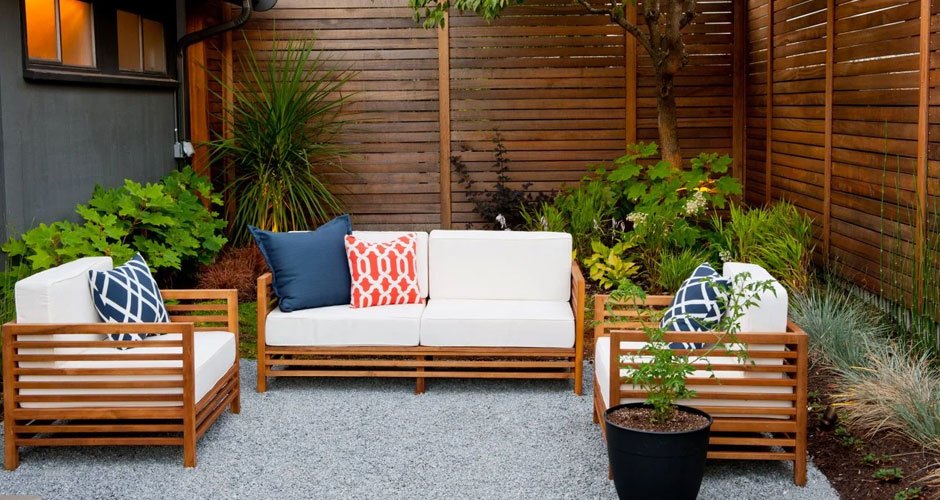
1. The Luxe Outdoor Lounge

A well-designed patio should feel like an extension of your indoor living space. Creating a luxe outdoor lounge allows you to enjoy the comfort of a living room while embracing fresh air and open skies.

Start with plush seating, like outdoor sofas and lounge chairs, designed to withstand Melbourne’s changing weather. Choose weather-resistant fabrics and add decorative cushions for a stylish, cosy feel. A coffee table or fire pit in the centre creates a natural gathering point, making the space perfect for entertaining.

Invest in high-quality outdoor furniture that complements your style and withstands the elements to complete the look.

2. Alfresco Dining Retreat

Nothing beats dining under the open sky; a beautifully designed alfresco area makes mealtimes even more enjoyable. A sturdy dining table paired with comfortable chairs will turn your patio into the perfect space for everything from casual breakfasts to evening dinner parties.

For an added touch of elegance, string lights or lanterns can create a warm, inviting atmosphere. Opt for a pergola or retractable awning to provide shade during the hotter months while allowing sunlight to filter through.

Consider using natural materials like timber or stone to connect your patio and the surrounding garden seamlessly. Adding potted plants or vertical gardens around the space will enhance the natural feel.

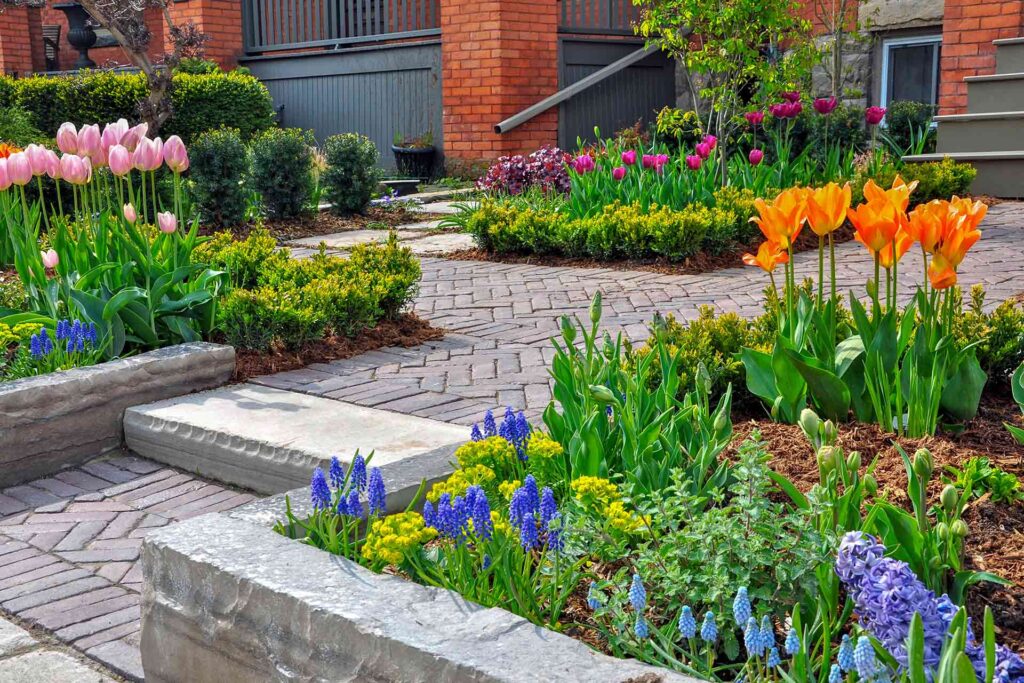
3. Mediterranean Courtyard Escape

If you love the charm of European-inspired outdoor spaces, a Mediterranean-style patio design could be perfect for your home. This style focuses on rustic textures, warm tones, and lush greenery to create a relaxing retreat.

Terracotta tiles or natural stone pavers provide a timeless base, while white or earthy-toned walls add a classic touch. For an authentic Mediterranean vibe, incorporate wrought-iron furniture, textured cushions, and ceramic planters filled with olive trees or lavender.

A minor water feature, such as a fountain, enhances the space’s tranquility while adding a soft, calming sound. This design works beautifully in both small courtyards and more extensive patios.

4. Minimalist Zen Garden

minimalist Zen garden patio is a fantastic choice for those who prefer a sleek, modern look. This design embraces simplicity, clean lines, and a sense of tranquility.

Use a neutral colour palette with subtle greys, whites, and natural timber to create a calming atmosphere. Smooth stone pavers or polished concrete flooring add a contemporary edge, while low-maintenance plants like succulents or bamboo enhance the serene feel.

A water feature, such as a pond or a minimalist fountain, brings in soothing sounds and complements the Zen aesthetic. Keep furniture choices simple and elegant, opting for streamlined chairs and tables with a focus on comfort and functionality.

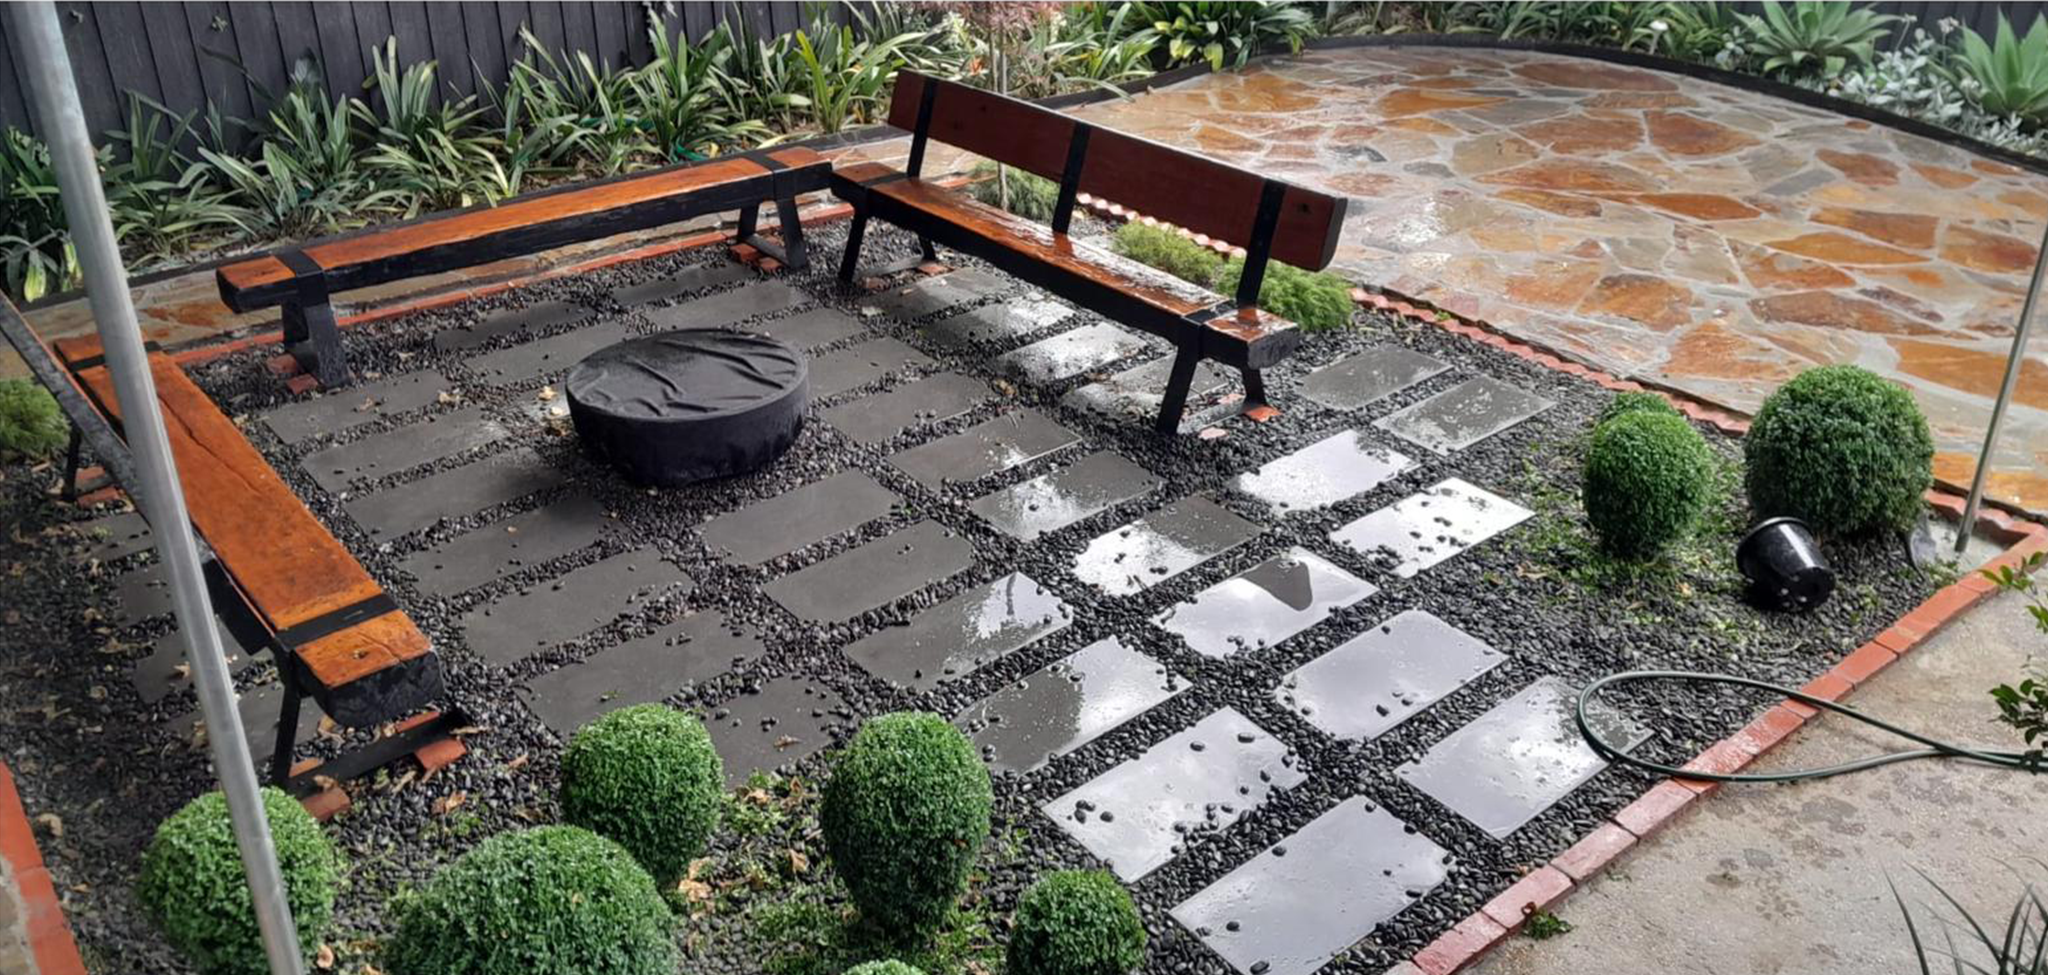
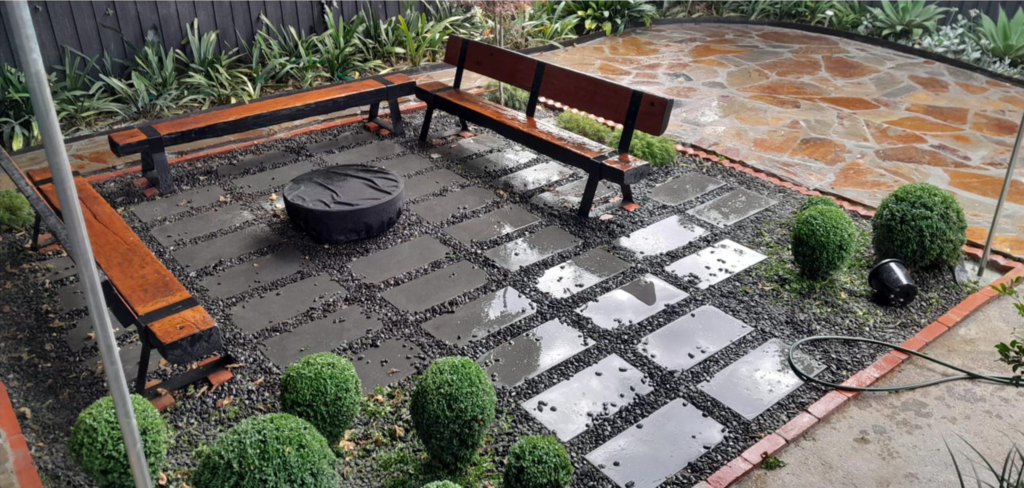
5. Cosy Fire Pit Haven

A fire pit is the ultimate feature for creating a warm and inviting patio. Whether built-in or portable, it becomes the heart of your outdoor space, perfect for entertaining on cool Melbourne evenings.

Arrange seating in a circular layout around the fire pit to encourage conversation and relaxation. Choose durable, weather-resistant chairs or built-in stone benches with soft cushions.

To enhance the experience, add soft outdoor lighting, such as lanterns or fairy lights, to create a warm glow. A combination of gravel and pavers around the fire pit adds texture and contrast while ensuring safety.

This patio design is ideal for families, providing a cosy spot for roasting marshmallows or simply unwinding under the stars.

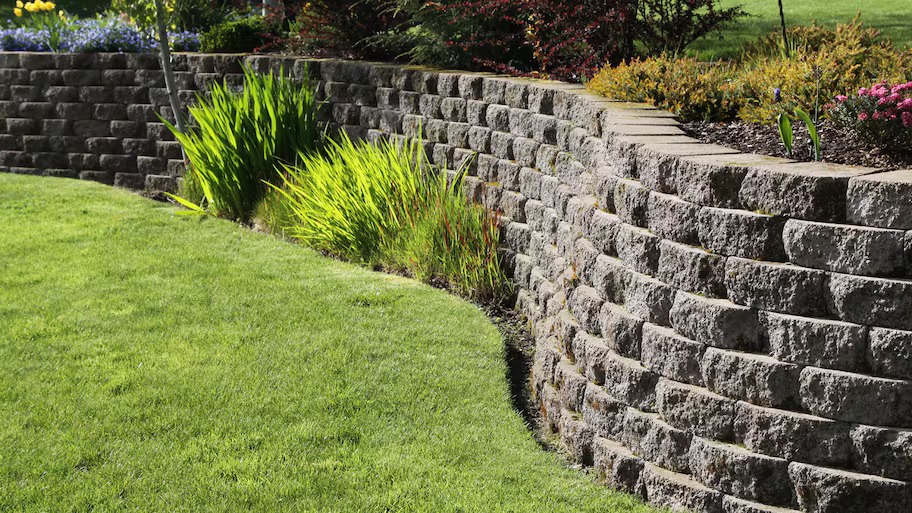
6. Green Oasis with Vertical Gardens

A patio filled with greenery offers a peaceful escape from urban life. If space is limited, vertical gardens or hanging planters provide a lush, natural feel without taking up floor space.

Use climbing plants like jasmine or ivy on trellises to create a living wall, adding privacy and a fresh atmosphere. Raised garden beds with herbs and flowers can also bring colour and fragrance to your patio.

Choose natural timber or stone furniture to enhance the garden feel and incorporate woven textures with rugs and cushions. A small water feature or birdbath can attract wildlife, creating a tranquil, immersive experience.

Choosing the Perfect Patio Design

When selecting the best patio design for your home, consider how you’ll use the space. Do you want a space for entertaining, relaxation, or dining? Also, consider the size of your patio, the amount of sunlight it receives, and how much maintenance you’re willing to commit to.

For a seamless look, ensure your patio connects visually and functionally with your home’s architecture and surrounding garden. Adding elements like stylish outdoor furniture, natural materials, and ambient lighting will complete the space beautifully. If you need help making your dream patio design come to life, don’t hesitate to get in touch with us.

Conclusion

With these six stunning patio design ideas, you can create an outdoor space that reflects your style and enhances your home’s appeal. Whether you prefer the laid-back elegance of a Mediterranean retreat, the fire pit haven’s warmth, or the Zen patio’s modern simplicity, the right design can transform your backyard into a sanctuary.

The Best Timbers to Use for Decking in Melbourne for Long-Lasting Beauty

The best timbers to use for decking in Melbourne are essential for creating a stunning, durable outdoor space. A well-built deck enhances the beauty of your backyard and adds value to your home. With Melbourne’s unpredictable climate, selecting the right timber ensures your deck remains strong against rain, sun, and general wear and tear. Whether after a classic look or something more modern, this guide will help you find the perfect timber for your decking project.

Spotted Gum – Durable and Stylish

Spotted Gum is one of the best timbers to use for decking materials. Its unique grain patterns and warm, rich tones create a luxurious outdoor setting.

  • Highly durable and resistant to termites.
  • Less prone to warping or shrinking compared to other hardwoods.
  • Requires minimal maintenance with periodic oiling.

This timber looks elegant and withstands Melbourne’s changing weather conditions.

Blackbutt – Strong and Sustainable

Blackbutt is a fantastic option for homeowners looking for strength and sustainability. Its pale brown colour gives decks a light, natural aesthetic that blends well with modern architecture.

  • It is naturally fire-resistant, making it ideal for bushfire-prone areas.
  • Easy to work with and quick to install.
  • It requires sealing to maintain its longevity.

Blackbutt decking is an excellent choice for a clean, contemporary outdoor space.

Merbau – Classic and Long-Lasting

Merbau is a favourite among homeowners due to its deep red-brown hue and incredible durability. It is one of the best timbers to use for decking, offering both aesthetic appeal and longevity.

  • Naturally resistant to rot and termites.
  • Highly durable, lasting for decades with proper care.
  • It requires regular oiling to maintain its rich colour.

Merbau’s striking look makes it a standout choice for Melbourne decks.

Jarrah – Premium and Elegant

Jarrah is known for its deep red tones and superior hardness, making it one of the most premium decking options. It’s an excellent choice for homeowners wanting a sophisticated, long-lasting deck.

  • Naturally resistant to decay and insect damage.
  • Ages beautifully over time, developing a silver-grey patina.
  • It requires sealing to preserve its deep colour.

Although slightly more expensive, Jarrah offers unmatched elegance and strength.

Ironbark – Tough and Weather-Resistant

For those looking for extreme durability, Ironbark is a top contender. As one of the hardest timbers available, it provides outstanding resistance to wear and environmental conditions.

  • Exceptionally strong, ideal for high-traffic areas.
  • Naturally resistant to termites and decay.
  • Requires pre-drilling due to its density.

Ironbark decking is perfect for homeowners wanting a sturdy, low-maintenance solution.

Silvertop Ash – Contemporary and Versatile

Silvertop Ash is gaining popularity in Melbourne for its light, soft colouring and versatility. It works beautifully in both modern and traditional home designs.

  • Lightweight yet durable, making installation easier.
  • A great option for eco-conscious homeowners.
  • It requires regular maintenance to maintain its strength.

This timber creates a fresh, contemporary deck that complements a range of outdoor styles.

Tallowwood – Hardwearing and Unique

Tallowwood is an excellent choice for rugged and low-maintenance decking material. Its pale yellow to olive-green tones offer a distinctive look.

  • Naturally resistant to termites and decay.
  • It has very high density, making it durable against heavy foot traffic.
  • Requires occasional sealing to protect its surface.

Tallowwood is perfect for a unique, long-lasting deck with minimal upkeep.

Choosing the Right Timber for Your Deck

When selecting the best timbers to use for decking, consider your budget, climate, and personal style. Hardwood options like Ironbark and Jarrah provide superior durability, while timbers like Blackbutt and Silvertop Ash offer a contemporary aesthetic. If you’re unsure which timber best suits your space, consulting The Art Of Gardening and Landscape’s decking installers services can ensure you make the right choice.

Maintaining Your Timber Deck

Regular maintenance is essential to keep your deck in top condition.

  1. Oiling and Sealing – Apply deck oil or sealant to protect against moisture and UV damage.
  2. Cleaning – Sweep away leaves and dirt to prevent staining and mould buildup.
  3. Inspection – Check for cracks or loose boards and repair them promptly.

With the proper care, your timber deck will remain beautiful and functional for years.

Conclusion

Finding the best timbers to use for decking in Melbourne depends on durability, aesthetics, and maintenance needs. Whether you prefer Merbau’s timeless elegance or Ironbark’s incredible strength, each option brings unique benefits to your outdoor space. A well-constructed timber deck enhances your home’s appeal and provides a relaxing retreat for years of enjoyment.

How to Choose the Right Types of Fencing for Your Home

Choosing the right types of fencing for your home can completely transform your outdoor space, adding privacy, security, and style. The perfect fence enhances curb appeal, defines boundaries, and protects your family and pets.

With so many materials and styles available, it can be overwhelming to decide which one best suits your needs. This guide will walk you through the most popular type of fencing options, helping you make an informed decision that complements your home’s aesthetics and functionality.

Timber Fencing – A Classic Favourite

Timber fencing is one of the most popular choices among Australian homeowners due to its natural beauty and versatility. It blends seamlessly with different landscapes, offering a warm and inviting feel.

  • Available in styles such as picket, slat, and lapped fencing.
  • It can be stained or painted to match your home’s aesthetic.
  • Regular maintenance, including sealing and staining, is required to protect against weather damage.

Timber fencing remains a top contender for those wanting a cost-effective yet stylish option.

Colorbond Fencing – Durable and Stylish

Colorbond fencing is a modern favourite known for its strength and sleek appearance. Made from high-quality steel, it withstands the harsh Australian climate, from scorching sun to heavy rains.

  • Resistant to rust, termites, and fire.
  • Available in a range of colours to complement any home design.
  • Low maintenance, requiring only occasional cleaning with water.

With its combination of durability and style, Colorbond fencing is ideal for homeowners who want a hassle-free yet visually appealing boundary.

Aluminium Fencing – Lightweight and Long-Lasting

Aluminium fencing is a fantastic option for those seeking a low-maintenance and corrosion-resistant solution. Due to its sleek, modern appearance, it is commonly used for pool enclosures, gardens, and front yards.

  • It won’t rust or deteriorate, making it perfect for coastal areas.
  • Available in various styles, including slat and tubular designs.
  • Lightweight yet strong, offering excellent security without obstructing views.

Aluminium is a smart investment if you want a fence that will last and require minimal upkeep.

Wrought Iron Fencing – Timeless Elegance

Wrought iron fencing is a standout choice for a touch of sophistication and grandeur. Known for its intricate designs and incredible strength, this type of fence adds character and security to any property.

  • Customisable with ornate designs or simple straight bars.
  • Extremely durable but requires periodic maintenance to prevent rust.
  • Provides strong security while maintaining visibility.

Though it may require more upkeep, the visual impact of a wrought iron fence is unmatched.

PVC Fencing – Affordable and Low-Maintenance

PVC fencing is an excellent alternative for budget-friendly and maintenance-free options. It replicates the look of timber without the need for staining or sealing.

  • Resistant to termites, moisture, and rot.
  • Available in different designs, including picket and privacy styles.
  • It can last for decades with minimal upkeep.

PVC is a great option if you want a long-lasting fence that requires almost no effort to maintain.

Bamboo Fencing – Sustainable and Stylish

Bamboo fencing is gaining popularity among eco-conscious homeowners looking for a natural and stylish barrier. It offers a tropical aesthetic while being an environmentally friendly choice.

  • Highly sustainable due to bamboo’s fast-growing nature.
  • Naturally resistant to pests and moisture.
  • Provides excellent privacy and wind protection.

Bamboo fences bring warmth and texture to outdoor spaces while supporting sustainable living.

Chain-Link Fencing – Practical and Cost-Effective

Chain-link fencing is a practical solution for those prioritising affordability and function over aesthetics. It is commonly used for security, pet enclosures, and commercial properties.

  • Durable and weather-resistant.
  • It can be enhanced with climbing plants for a greener look.
  • Provides visibility while securing a space.

While not one of the most decorative types of fencing, chain-link fencing is reliable for protecting areas.

Stone and Brick Fencing – Strong and Elegant

For homeowners seeking a solid and striking boundary, stone or brick fencing provides excellent durability and timeless appeal.

  • Extremely strong, offering both privacy and security.
  • Requires little maintenance compared to other fencing materials.
  • It can be designed to match traditional and modern architecture.

Although more expensive up front, stone and brick fences add long-term value to a property.

Choosing the Right Types Of Fencing for Your Home

When selecting the best types of fencing, consider factors such as security, maintenance, aesthetics, and budget. If you’re unsure about installation, consulting professional fencing contractors can help ensure your fence is built to last.

Conclusion

With so many types of fencing available, choosing the right one depends on your specific needs and style preferences. Whether you prefer the timeless charm of timber, the durability of Colorbond, or the elegance of wrought iron, each option brings unique benefits to your home. Investing in the right fence enhances privacy, security, and overall curb appeal, making it a crucial element of your outdoor space.

How to Choose Plants for Your Backyard

Transforming your backyard into a lush haven is an exciting project that begins with the careful selection of plants. The right plants not only elevate the aesthetic appeal of your outdoor space but also create an environment that’s sustainable, functional, and tailored to your personal style. This guide will help you navigate how to choose plants for your backyard, ensuring every decision you make complements your vision and lifestyle.

Understanding Your Backyard

Before diving into plant selection, it’s essential to assess the unique characteristics of your backyard. This foundational step helps you make informed choices about the plants that will thrive in your space.

  1. Climate and Microclimates
    Consider your region’s climate, including temperature ranges, rainfall patterns, and frost susceptibility. Within your yard, you might also notice microclimates—areas that get more sun, shade, wind, or are particularly dry or damp. These details are critical when deciding how to choose plants.
  2. Soil Type
    Soil is the lifeline of your plants. Conduct a soil test to determine if your soil is sandy, loamy, or clay-heavy, and adjust it accordingly. For example, sandy soils drain quickly and benefit from organic matter, while clay soils retain water and need proper aeration.
  3. Available Space
    Take note of your backyard size and any permanent features like pathways, patios, or garden beds. Smaller yards may benefit from compact plants, while sprawling backyards can accommodate larger trees or expansive ground covers.

Prioritising Your Backyard Goals

Knowing how to choose plants means understanding what you want from your backyard. Do you want a tranquil retreat, a lively entertaining space, or a productive garden?

  1. Aesthetic Appeal
    Choose a mix of flowering plants, ornamental grasses, and trees for a visually striking garden. Layering plants by height—tall trees at the back, shrubs in the middle, and flowers at the front—adds depth to your design.
  2. Wildlife Attraction
    Native plants are excellent for attracting local birds, bees, and butterflies. They’re well-suited to your climate, require less maintenance, and contribute to local biodiversity.
  3. Functionality
    Opt for plants that serve a purpose. For example, hedges and shrubs can create privacy, trees provide shade, and ground covers can prevent soil erosion.
How to choose plants

Selecting the Right Plants

Here are the key considerations on how to choose plants for your backyard:

  1. Sunlight Requirements
    Observe how much sunlight your backyard gets throughout the day. Plants are generally classified as full-sun, partial-sun, or shade-loving. Choose plants that align with the sunlight available in specific areas.
  2. Water Needs
    Group plants with similar watering requirements together. This technique, called hydrozoning, helps you conserve water and makes maintenance easier.
  3. Plant Size and Growth Rate
    Understand how large plants will grow over time. Avoid overcrowding by giving each plant enough space to reach its mature size. Fast-growing plants might provide instant gratification but could require more pruning.
  4. Seasonality and Colour
    Choose a mix of plants that bloom in different seasons to keep your backyard vibrant year-round. Consider pairing evergreen shrubs with flowering perennials for a consistent and colourful display.

Landscaping Tips for a Cohesive Design

Landscaping ties your backyard together, blending plants with hardscaping elements like paths, decks, and garden beds. For expert advice and inspiration on how to choose plants, consult us at Art of Gardening and Landscaping. We specialise in creating stunning backyard designs tailored to your needs.

  1. Create Focal Points
    Anchor your design with standout plants or features like a flowering tree, a sculptural bush, or a vertical garden. Surround these focal points with complementary plants to draw attention.
  2. Use Layers and Textures
    Mix plants with varying leaf shapes, textures, and heights. The contrast adds visual interest and creates a more dynamic landscape.
  3. Define Zones
    Break your backyard into zones for dining, lounging, or gardening. Use plants like hedges or flower beds to demarcate these areas naturally.
  4. Low-Maintenance Options
    If you’re short on time, consider drought-tolerant plants, native species, or succulents, which require minimal care and still offer great visual appeal.

Common Mistakes to Avoid

Even the most enthusiastic gardeners can make mistakes when learning how to choose plants. Avoid these pitfalls to ensure success:

  1. Overplanting
    It’s easy to get carried away with too many plants. Overcrowding can lead to competition for sunlight, water, and nutrients, reducing plant health.
  2. Ignoring Soil Health
    Neglecting to improve your soil can result in poor plant growth. Invest in quality soil and mulch to nourish your plants.
  3. Mismatched Plants
    Don’t place water-hungry plants next to drought-tolerant species or shade-loving plants in full sun. Each plant needs to be in the right spot to thrive.
  4. Neglecting Long-Term Growth
    Planting fast-growing trees or shrubs too close to your house or fence can lead to problems as they mature. Always consider the plant’s ultimate size.

Caring for Your Backyard Plants

Once your backyard is planted, regular care ensures it remains a thriving space. Here are some tips:

  1. Water Wisely
    Water early in the morning to reduce evaporation. Deep watering encourages strong root growth, while drip irrigation is an efficient method for consistent hydration.
  2. Pruning and Deadheading
    Trim overgrown plants and remove spent flowers to encourage new growth. Pruning also helps maintain the shape and size of your plants.
  3. Mulching
    A layer of mulch helps retain soil moisture, regulate temperature, and reduce weed growth. Organic mulch also enriches the soil as it breaks down.
  4. Seasonal Checks
    Reassess your garden each season to remove dead plants, refresh mulch, and add new plants to fill gaps

Conclusion

Creating a vibrant backyard is as much about planning as it is about planting. By taking the time to assess your space, set goals, and carefully choose plants, you can craft a backyard that’s not only beautiful but also functional and sustainable. For expert landscaping advice, consider reaching out to Art of Gardening and Landscaping to bring your vision to life.

Garden Bed Retaining Walls: How to Build the Right Kind

Creating a well-structured and visually appealing garden involves more than just planting flowers and shrubs. For many homeowners, garden bed retaining walls are the key to adding both functionality and style to their outdoor spaces. These walls provide essential support, prevent soil erosion, and create defined, eye-catching garden beds. If you’re wondering how to choose the right type of retaining wall for your garden, this guide will walk you through everything from planning to execution.

Why Build Garden Bed Retaining Walls?

Garden bed retaining walls are more than just decorative features. They serve multiple purposes, making them an integral part of landscaping design.

  1. Preventing Soil Erosion
    Retaining walls hold back soil, particularly in sloped areas, preventing erosion and ensuring that plants have a stable growing environment.
  2. Enhancing Garden Design
    These walls allow you to create tiered gardens, raised beds, or distinct sections, giving your backyard a polished, professional look.
  3. Improving Drainage
    With proper planning, retaining walls can direct water flow away from your home and garden beds, reducing the risk of flooding or waterlogged soil.
  4. Maximising Usable Space
    For sloped gardens, retaining walls can create flat, usable areas for planting, seating, or pathways.

Choosing the Right Material

When building garden bed retaining walls, the material you choose plays a significant role in their durability, functionality, and overall appearance. Here are some popular options:

  1. Timber
    • Affordable and easy to install.
    • Ideal for rustic or natural garden designs.
    • Requires treatment to prevent rot and termite damage.
  2. Concrete Blocks
    • Durable and versatile with a modern aesthetic.
    • Available in various colours, textures, and shapes.
    • Often used for curved or tiered retaining walls.
  3. Stone
    • Timeless and elegant, perfect for a natural look.
    • More expensive but highly durable.
    • Great for both traditional and contemporary gardens.
  4. Brick
    • Classic and long-lasting with a clean appearance.
    • Works well for formal garden designs.
    • Requires professional expertise for proper installation.
  5. Gabion Walls
    • Made of wire cages filled with rocks or stones.
    • Eco-friendly and offers a unique, industrial aesthetic.
    • Excellent for drainage and erosion control.
Garden Bed Retaining Walls

Planning Your Garden Bed Retaining Wall

Proper planning is essential to ensure your retaining wall is both functional and visually appealing.

  1. Assess the Area
    Identify the location for your retaining wall and evaluate the slope, soil type, and drainage needs.
  2. Determine Wall Height
    The height of your retaining wall affects its construction method. Walls over one metre may require council approval and professional expertise to ensure stability.
  3. Check Drainage Requirements
    Poor drainage can compromise the integrity of your retaining wall. Incorporate drainage solutions such as gravel backfill and perforated drainage pipes.
  4. Sketch Your Design
    Create a detailed plan of your garden layout, including dimensions and material specifications.

Building Your Garden Bed Retaining Wall

Here’s a step-by-step guide to building a garden bed retaining wall:

  1. Prepare the Foundation
    • Clear the area and dig a trench for the base.
    • Ensure the trench is level and wide enough to accommodate your chosen material.
  2. Lay the Base Material
    • Use crushed stone or gravel to create a stable foundation.
    • Compact the base material to prevent settling over time.
  3. Place the First Layer
    • For timber, lay the beams horizontally. For stone or concrete blocks, ensure the first row is level.
    • Use a spirit level to double-check accuracy, as this layer sets the tone for the entire wall.
  4. Add Subsequent Layers
    • Stagger the joints between layers for added strength.
    • Secure each layer with construction adhesive, pins, or fasteners, depending on the material.
  5. Backfill with Gravel
    • As you build, backfill the space behind the wall with gravel to improve drainage.
    • Compact the gravel to reduce air pockets and enhance stability.
  6. Install Drainage Pipes
    • Place perforated drainage pipes behind the wall at the base.
    • Ensure the pipes are angled to direct water away from the wall.
  7. Finish with Capstones or Topsoil
    • Add capstones for a polished look, or fill the top with soil for planting.
    • Inspect the wall for any gaps or imperfections before planting.

When to Call the Professionals

While DIY retaining walls can be a fun and rewarding project, some situations require the expertise of professionals. If your retaining wall needs to support a significant amount of soil or exceeds one metre in height, professional assistance ensures safety and compliance with local regulations.

For expert advice and quality workmanship, consider consulting Art of Gardening and Landscaping’s retaining wall specialists. Their team offers tailored solutions for creating durable and visually striking retaining walls.

Common Mistakes to Avoid

  1. Skipping the Foundation
    A poorly prepared base can lead to instability and premature failure.
  2. Ignoring Drainage
    Inadequate drainage causes water pressure to build up, compromising the wall’s structure.
  3. Choosing the Wrong Materials
    Not all materials are suitable for every environment. Consider factors like soil type, climate, and wall height.
  4. Improper Backfilling
    Using soil instead of gravel for backfill can lead to poor drainage and instability.

Maintaining Your Garden Bed Retaining Wall

Regular maintenance ensures the longevity of your retaining wall:

  1. Inspect Annually
    Check for cracks, leaning, or water pooling around the wall.
  2. Clean Debris
    Remove leaves, dirt, and weeds to prevent damage or drainage blockages.
  3. Repair Damage Promptly
    Address small issues like loose stones or shifted timber before they escalate.
  4. Reapply Sealant
    For timber and concrete walls, reapply sealant every few years to protect against moisture.

Conclusion

Building the right garden bed retaining wall is about balancing functionality with style. From selecting the perfect material to ensuring proper drainage, each step plays a crucial role in the wall’s durability and appearance. Whether you’re tackling a DIY project or enlisting professional help, investing time and effort into planning and construction will reward you with a beautiful, functional addition to your garden. For professional retaining wall solutions, visit Art of Gardening and Landscaping’s specialists to bring your vision to life.


How to Remove Paint From Concrete the Easy Way in 7 Steps

Removing paint from concrete can be a challenging task, but with the right tools, techniques, and guidance, you can get it done quickly and effectively. Whether you’re revamping your patio, garage floor, or outdoor walls, stripping paint from concrete is often the first step toward achieving a fresh, polished look. This guide will walk you through how to remove paint from concrete using seven simple steps that save you time and effort.

Why Remove Paint From Concrete?

Painted concrete can start to chip, peel, or fade over time, diminishing the appearance of your surfaces. Removing old or damaged paint is necessary if you want to:

  • Prepare for a New Coating: Old paint layers can interfere with adhesion if you’re repainting.
  • Restore the Natural Look: Stripping paint reveals the raw beauty of concrete.
  • Improve Durability: Cleaning the surface ensures new finishes or sealants last longer.

Tools and Materials You’ll Need

Before you begin, gather these essentials to make the process seamless:

  1. Protective Gear: Gloves, goggles, and a dust mask.
  2. Paint Stripper: Choose a chemical stripper suitable for concrete.
  3. Scrub Brush: A stiff-bristled brush works best.
  4. Pressure Washer: For thorough cleaning and paint removal.
  5. Plastic Scraper: To lift loosened paint.
  6. Drop Cloths or Plastic Sheets: To protect surrounding areas.
  7. Soap and Water: For final cleanup.
remove paint from concrete

How to Remove Paint From Concrete in 7 Steps

Follow these seven simple steps to remove paint from concrete effectively:

Step 1: Clean the Surface

Start by sweeping or vacuuming the concrete to remove dirt, dust, and debris. Cleaning the surface ensures the paint stripper adheres evenly and works effectively.

Step 2: Protect the Surrounding Areas

Use drop cloths or plastic sheets to cover nearby walls, plants, or furniture. This step prevents accidental damage to surrounding areas while working with chemicals or tools.

Step 3: Apply a Paint Stripper

Choose a chemical paint stripper specifically designed for concrete. Apply it evenly over the painted surface using a paintbrush or roller. Allow it to sit for the recommended time (usually 30 minutes to a few hours) to loosen the paint.

Step 4: Scrape Off the Paint

Once the paint stripper has done its job, use a plastic scraper to remove the loosened paint. Work in small sections and be thorough, ensuring you scrape away as much paint as possible.

Step 5: Scrub with a Brush

For stubborn paint residues, use a stiff-bristled scrub brush dipped in soapy water. Scrub the surface thoroughly to lift any remaining paint particles.

Step 6: Pressure Wash the Area

Using a pressure washer, rinse the concrete to remove leftover paint, paint stripper, and debris. Be mindful of the pressure settings to avoid damaging the concrete surface.

Step 7: Final Cleanup

Inspect the area for any remaining paint. Repeat the scrubbing or scraping process if necessary. Once satisfied, clean the surface with soap and water, then let it dry completely.

Pro Tips for Success

  1. Work in Sections: Break the project into smaller areas for better control and efficiency.
  2. Choose Eco-Friendly Strippers: Opt for biodegradable paint strippers to minimise environmental impact.
  3. Test on a Small Area: Always test your chosen stripper on a hidden spot to ensure it won’t damage the concrete.
  4. Be Patient: Let the paint stripper sit for the recommended time to maximise its effectiveness.

When to Call a Professional

If the paint has penetrated deeply into the concrete or covers a large area, it might be time to call a professional. Experts have the tools and experience to remove paint from concrete quickly and without damage. If you’re also looking to enhance your outdoor areas, consider consulting Art of Gardening and Landscaping’s specialists for professional advice and services.

Common Mistakes to Avoid

  1. Skipping Surface Preparation: Failing to clean the surface before applying a stripper can reduce its effectiveness.
  2. Using the Wrong Stripper: Not all paint strippers are suitable for concrete, so check the label carefully.
  3. Rushing the Process: Removing paint from concrete takes time. Let the stripper work and avoid skipping steps.
  4. Ignoring Safety Precautions: Always wear protective gear when working with chemicals and high-pressure tools.

Maintaining Concrete Surfaces

After successfully removing the paint, consider these maintenance tips to keep your concrete looking great:

  1. Seal the Surface: Apply a concrete sealer to protect it from future stains or damage.
  2. Regular Cleaning: Sweep and wash the surface periodically to keep it clean.
  3. Avoid Harsh Chemicals: Use mild detergents and avoid abrasive cleaners that can damage the concrete.
  4. Inspect for Cracks: Repair any cracks promptly to prevent further damage.

Conclusion

Removing paint from concrete doesn’t have to be a daunting task. With the right tools, techniques, and a bit of patience, you can restore your surfaces to their original condition or prepare them for a fresh new look. By following these seven steps, you’ll achieve professional-looking results with ease. For large or complex projects, consult experienced professionals like Art of Gardening and Landscaping for expert help with your outdoor transformations.